Tuesday, May 24, 2011

The Simple Guide to Using Coupons


First, let me say that the nice lady that writes this blog is not a crazy couponer. You will not see me on a reality TV show, although I must admit we do not have cable so I have never seen it.  I use coupons every week for products that I would normally buy. Unless I can get it for free (getting things for free does become a game), I only buy things that would normally be in my cart. I have been using coupons for about a year and I save between 40%-50% of my weekly household bill. I use coupons for just about everything but I see the most savings in groceries, household goods, personal care stuff (shampoo, deodorant, etc..) and medicine. I spend, on average, three hours a week clipping and hunting online for good deals.
There are definitely tricks of the trade when it comes to using coupons successfully. I am going to lay out the basics then I will do an expanded post explaining each.
  • Know when to use your coupons. Just because you have a coupon does not mean you use it. Every product is on a 6-ish week rotation. You need to know when the product you want to buy will be at its cheapest price and then you use your coupons. 
  • Know your store's coupon policy. Each store deals with coupons in a different way and it is important to use each coupon to its full potential. I will talk about some of the stores that I frequent and how you can find out what your stores policies are. 
  • Know where to get coupons. You do NOT need to pay for a coupon clipping service. I do not use one and have never needed one. I will discuss the newspaper, online resources, in store sources, and other ways to get those special little pieces of paper!
  • Keep organized. There is nothing worse than knowing you have a coupon but not being able to find it. There are a lot of ways to do this. I have found one that I LOVE and will share it with you!
  • Actually using the coupons. Ok, you have gone through a lot of work to clip and research; please don’t leave them in your car!
As I go through this feel free to ask questions and post your own tips and tricks. The last post I do will be on all of the things I have been learning over the last year on my quest to save money. Yes you can save money, real money that you would have spent. This is money you can use to take a vacation, buy something new or put in savings for another day.
I challenge you to try this for two months, if it does not work you have not lost much but if it does you will have saved some hard earned money!

Monday, May 23, 2011

My Broccoli Flowered


My broccoli flowered! Well, the big one did. I'm very sad. So now I will put it on my dining room table, at least then it can be pretty for awhile.
I did some research, and I think that we had two days in the 80s and it needed to be picked before it got that hot. I have two more plants that still look okay, so I will be paying very close attention to them over the next week. The broccoli heads are very small though… how big does your broccoli get?

Thursday, May 19, 2011

Square Foot Bed Layout


Here is the breakdown of what is in each of my 4x4 beds.

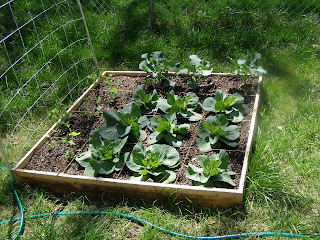
Bed 1 (4'x4'x6")
Bed 1
  • Four squares of peas - 6 plants per square (started from seeds)
  • Three squares of broccoli - 1 plant per square (bought plants from garden store)
  • Six squares of cabbage - 1 plant per square (bought plants from garden store)

Bed 2 (4'x4'x12")
Bed 2
  • Four squares of white onion starts - 16 per square (the kind that have green tops and bundled together)
  • Four squares of white onion bulb starts - 16 per square (come in a bag of 84 bulbs)
  • Three squares of sweet mini carrots - 16 per square (started from seeds)
  • Three squares of heirloom touchon carrot - 16 per square (started from seeds)
  • Two squares of brussels sprouts (bought plants from garden store)

Bed 3 (4'x4'x6")
Bed 3
  • Three squares of cucumbers - 2 per square (started from seeds)
  • One square of green beans - 6 per square (started from seeds)
  • Four squares of cabbage - 1 per square (bought plants from garden store)
  • Eight empty, I will plant soon

Bed 4 (4'x4'x6")
Bed 4
  • Two squares of Roma tomatoes 1 per square (started from seeds)
  • One square of super sweet cherry tomatoes - 1 per square (bought plants from garden store)
  • Four squares of Rutgers tomatoes - 1 per square (bought plants from garden store)
  • Four squares of green bell peppers - 1 per square (bought plants from garden store)
  • One square of red bell peppers - 1 per square (bought plant from garden store)
  • One square of hot peppers - 1 per square (started from seeds)
  • One square of jalapeno peppers - 1 per square (bought plants from garden store)

Tuesday, May 17, 2011

Adventures In Square Foot Gardening


This is my first year Gardening and I absolutely love it! Because we have a small yard and I wanted to try and grow a lot in a small space I went with the Square Foot Method. The first thing I did was read “All New Square Foot Gardening” by Mel Bartholomew. This book is fantastic! It gives very easy instructions for building the boxes, mixing the soil, building cages to keep the critters out, and what to plant when.

My Hubby helped me (read: he did a lot of the work…) to build four boxes. Each box is 4'x4'. Three of the boxes are 6 inches deep while the other box is 12 inches deep. We also built cages that sit on top of the box until the plants are bigger to keep our evil squirrels out.

Our squirrels are possessed by the way. They do things just to mess with me, like dig up my plants and lay them next to the bed, hide things in my pots, and then they sit on my deck looking in the windows to see my frustration. 

I started by planting cabbage, broccoli, peas, and onions. Then I put in carrots and brussels sprouts. I have now started the peppers, tomatoes, cucumbers, beans, more cabbage and herbs.

Here are my beds in early April.
Here they are now!
Amazing! It is so exciting to see all of the plants growing and thriving. It is also crazy how much greener the grass is now. Because I am growing in raised beds, I don’t really have to weed so after everything is planted there is very little work. I am not using any chemicals and I am very careful to inspect the plants every day for bad bugs. I took a horticultural class in college and I remember the professor saying that a healthy plant will need fewer chemicals to keep it that way. I am trying to take off dead leaves and stems to keep my plants as healthy as I can!

Tomorrow I will post about what is in each bed and how many plants I put per square.

Monday, May 16, 2011

Homemade Fruit Roll-ups


I spent one day last week making homemade fruit leather. It turned out tasting great but not so pretty… I am going to make some more this week and will post pictures of this week’s batch also.
I used a dehydrator to dry the fruit and my food processor to pulverize it. It only took me about an hour to make the fruit goo, and then it took about 10 hours to dry it. I know that sounds like a lot of time but you just set it on your counter and let it go. The dehydrator does all the work.
I am currently using my mom’s old dehydrator and it works great. They are not expensive to buy (under 30 dollars) and we use ours all the time. Some other things we have dried include: fruit, beef jerky, chili (that was my hubby's project and it turned out great!) and flowers. Just making beef jerky yourself would cover the cost of buying the dehydrator and it tastes SO much better!
Here is what I learned:
- Fill the fruit roll up trays very full. When everything starts to dry, the fruit shrinks and none of my trays stayed in a solid sheet (they all had holes from not filling the trays enough).
- Make sure your fruit is very soupy, no chunks! The chunks mess up the texture of the roll-up.
- I lined the trays with parchment paper.  I'm not sure that it was helpful and I will try it without next time and let you know which way works better.
- The directions say to spray the tray with cooking spray.  I did this but I think I got a little over excited. The bottoms of some of the fruit roll-ups were oily. Oily = yucky, so don’t get too crazy with the spray.
Here is a picture of my pretty fruit, I used four quarts of strawberries and one pineapple. I did not put in any sugar or any other type of sweetener. The fruit was perfect all by itself! This made four trays.
I then cleaned the fruit well, cut off all the stems, and my loving hubby helped me skin the pineapple because he cares and likes to eat while he helps.

Put everything in the food processor, you could also use a blender.
Then dump it on to the tray
That’s it! Set your dehydrator to 135 - 145 for 10 hours, but I think it will take longer next time because the trays will be thicker.
Here is how I am storing the finished rolls.
I wrapped each piece in plastic wrap and then put them in an air tight jar. They should last two or three weeks this way. Now I hate working with plastic wrap but I do have a tip, if you put the roll in the freezer for a few hours before you need to use it, it will not stick together as bad. So, when you start drying the fruit, throw your plastic wrap in the freezer!

Overall I think that this project was a success! The baby LOVED them and it cost me around $8.00 for the fruit and that made four trays. The pre-made stuff for babies is $2.75 for a box and it has five little strips in it so I think that making it myself is much more cost effective, yummier, and less processed!


Designed by Simply Fabulous Blogger Templates