Monday, June 27, 2011

Handwritten Recipe Books

 I am the very proud owner of quite a few handwritten recipe books that have been passed down though my family. I have two from my dad’s side of the family and two from my mom’s side.  My dad is all Polish, his family immigrated from Poland and kept many of the Polish cooking traditions alive and well. My mom’s side of the family is a mix of Irish and Eastern European and cooked similar things to my dad’s family. 
Pages from my Great Aunt's cookbook

I grew up eating Haluski, Pierogies, Galumpkis (cabbage rolls), homemade Kielbasa and many other wonderful dishes. My great grandmother made wine, pickles, and even head cheese in her summer kitchen using the vegetables from her garden and I will be following her handwritten directions to do the same. 

Handwritten cards and newspaper clippings from my mom's family

All of these recipes have been passed on to me through these handwritten cookbooks. Sometimes the recipes are in a mix of Polish and English or Slavic and English and have directions like use enough water to make the dough sticky but not wet… but that makes the books even more precious. If you are lucky enough to have an old family cookbook dig it out and start cooking from it. I bet those are some of the best dishes you will ever make and you will be keeping very important traditions alive. 

I am going to be sharing some of my family recipes from these cookbooks. Some of them will be very old recipes and some added from the younger generations but all of them will use a lot of butter and taste fantastic!  I am lucky to have an extremely strong food heritage and I am excited to start sharing that with you.

Friday, June 24, 2011

Juicing Mulberries

Hello all! I hope that you have had a fantastic week. I am going to walk you through how we juiced the mulberries today. It was a messy process, but not too difficult. If you remember I talked about using the berries that are not as clean for juicing? Well because of the way juicing works you do not use any of the pulp in the finished product so if there are a few little leaves and things still in with the berries that's OK you will not use that stuff anyway.

First we skimmed the floating berries off of the top of the tub.  Then picked out the big sticks and gunk.
We used a frying skimmer for this process
After you have the berries you are going to juice ready to go, put together the rest of the juicing gear. You will need gloves, this is very very important unless you want to look like Barney.

Yes I understand this is kind of a creepy picture....
Next set your splatter screen on top of a big pot like so

No tool in my kitchen is safe from multiple jobs!
Then lay out your cheese cloth folded over a few times


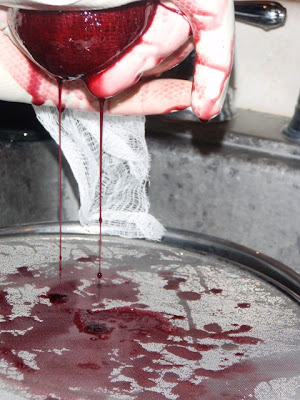
Now it is time to squish some berries! Put a scoop of berries on the center of the cheese cloth and pick up all four corners. Then start to squish out the juice thought the mesh screen and into the pot.


Looks kind of weird from this point of view! 
This is why we use the mesh strainer. As you continue to squish seeds with start to get loose.


After you have squished all the juice out throw away the pulp.


Then put the juice in a container for storage in the fridge until you need it. We made all of our juice into jelly. I like using Mason jars to store the juice.


Now sit back and admire all of your hard work! It takes four cups of juice to fill a jar and about 12 cups of berries to get that much juice!

Thursday, June 23, 2011

Coupon Post 3 - How to Find Coupons

There are many ways you can begin collecting coupons. I have never used a clipping service and I do not pay for any special websites. I do pay for a Sunday paper and use the coupons out of my parents' and my mother in law's paper. Any other coupons I use I find online or receive in the mail by signing up with a company for special promotions.

Facebook
Many manufacturers have Facebook pages. If you "Like" their page then you can print off coupons they post. Many of these companies also send out information about upcoming sales. Some of the pages that I receive updates from on my Facebook feed are: Ballpark, Burt's Bees, Disney, and Pampers.

To find a manufacturer that you would be interested in, search their name and just click the Like button. This is also a great way to get deals on things happening in your town. Find a local museum, park, or radio station and watch for them to start talking about deals on events.

Manufacturer websites
Manufacturers offer coupons to print from their websites. Many of these coupons are offered in exchange for you signing  up for an account on their site. I recommend creating a separate email account to use only when signing up for coupons and free samples. Many times you will receive follow-up emails from these companies, and I don’t like to fill my regular inbox with these offers. In these e-mails you will often receive additional coupons or notices when big sales are going to happen so for brands that you use a lot this is a great tool. Here are some of the sites that I am a member of. Most of these sites send me booklets of coupons once a month.

Marzetti

Kelloggs

Johnson & Johnson

Earths Best

Loading coupons onto a card
Many stores like Kroger have a loyalty card and you can load coupons directly onto that card. This is a great option for using coupons with no effort. There are a few problems with using coupons this way, including:
1. Kroger and other stores will not double coupons loaded onto a card. This means that if you use a paper coupon you will get more money off.
2. It is very easy to forget what coupons you have when you can't see them.

To help combat these problems, I only load coupons that are over a dollar and only for products that I am not worried about hitting a sale with. If I do load a coupon that I really need to remember to use, then I make sure to write it down in my binder. We will talk about binders next!

Here are some other sites that you can sign up your card and load away!  Again all of these sites are free! I love free things don't you?

cellfire

shortcuts

pgesaver


Online Coupon Website
Companies like coupons.com, smartsource.com and redplum.com require a software download before you print coupons. This is a one time step and is completely safe.They do this so that each coupon has a different bar-code. All of these sites are free.

These sites change the coupons about once a month and you will see some of the same things offered on all of the sites. You can print each coupon twice. After you print the first time hit back on your browser, when it asks if you want to resend the information say yes and you will print again. These sites are a huge source for printable coupons I use them all the time! 

 Redplum

Coupon Suzy

Smart Source

Coupons.com

The Store Website
One of the best places to find store specific coupons is Target. The Target webpage has coupons that you can print out that are only good at Target. The best part about this is that you can use a Target coupon (that you got from their page) and a manufactures coupon on the same product! This is when I can really do some damage with stacking. Here is the link to the Target Coupon Page.

Kroger does something similar to this but it is a mailer. If you go onto the Kroger website and make a profile they track what you buy though your card and then once a month or so send out a packet of coupons specifically tailored to what you buy most often. These coupons are only good for use at Kroger and cannot be stacked.

Catalina Coupon Basics

The term Catalina Coupons refers to any coupon printed at the cash register when you complete a purchase at a store. They are often also referred to simply as “Catalinas,” “check-out coupons,” or “register rewards." They are printed by a Catalina machine that sits right next to the cash register.

Types of Catalina Coupons

There are two types of Catalina coupons. The first and most common type are cents-off coupons that are good on a specific product. For example $1.00 off any box of General Mills cereal.

The other type of Catalina coupon is an on your next order (OYNO) coupon and these are coupons that are for cents-off anything in your next purchase. For example $1.00 off your next purchase. There is usually some fine print exclusions on these that typically exclude you from using OYNO Catalina coupons on alcohol, tobacco, gift cards and stamps, and in some states, dairy or fluid milk.

Both types can either print based your recent store purchases or because the brand is having a special promotion.

Catalina Marketing has recently also launched a new printable coupons product. This is quite different than their check-out coupons, but offers other unique coupon savings. It is called Coupon Network and it allows you to print coupons directly from your computer for use at your local stores.

Other coupon locations that sometimes get missed:
  • Peelies: these are the coupons that are stuck to the product. If you don't need the product now, you might later.
  • Blinkies: those coupons in the SmartSource machines that may or may not have the little blinking light. Most of the time you want to save these and wait for a sale not use them when you find them.
  • Tearpads: usually these pads are on the shelf or display. I see a lot of these at Christmas time.
  • Try Me Free or Rebate forms: these are a great way to try a new product and/or make money on a deal! Buy an item on sale, use the coupon, and send away for the rebate!
I know that all of this seems like a lot of time and work, but time is money. Did you know that coupon clipping pays an average of $86 per hour according to the Wall Street Journal? I think that's worth the time and just think of this as a challenge to keep as much of your hard earned money as you can!

Do you have other places to find coupons that I missed?

Wednesday, June 22, 2011

Homemade Natural Cleaning Products


I started researching and trying natural cleaning products when I became pregnant.  I was told by my doctor not to use a lot of the cleaning products that I used everyday because the chemicals in them could be harmful to the baby. Well I'm glad my doctor was worried about my baby, but what about me and my husband? We have been breathing in that stuff for years, what is it doing to us? Also if you have to put on a haz-mat suit with gloves up to your elbows, then immediately wash your hands if any of the cleaning goo touches you, one might want to ponder what is in said bottle.

I must confess there is another reason for my green cleaning ways, I’m cheap. Yes I said it, I’m just being honest here. Making your own cleaning products is tremendously cheaper than buying them. I mean A LOT cheaper.

The first one I am going to talk about is the tub and tile cleaner. It worked very very well. I am embarrassed to say how dirty my tub was... and it cleaned all the mildew and soap build up without a problem. It did take some work but im happy to say that my tub is now a new color! I ended up cleaning it twice because the cleaning stuff started to dry before I was done but if you are not dealing with a crazy dirty tub it should not take as long. Below is what I used. I mixed up everything in a plastic container and used a sponge to scrub with. I make one recipe of the stuff and use it all to clean the tub, so no left overs to store!

Tub and Tile Cleaner

3/4 cup baking soda
1/4 cup powdered milk
1/8 cup liquid castle soap (this will be the most expensive thing you will buy, but it is used in a lot of the cleaning recipes and a little goes along way. I bought mine at Kroger in the organic section. I use the non-scented one because I wanted to be able to use essential oils. Target also sells it.)
5 drops lavender essential oil (I bought this at a health foods store, this step is optional if you do not want to invest in the oil, but it does smell nice)
Water

 - Recipe from "The Naturally Clean Home"

Combine all ingredients in a container and add enough water to make a paste. It did not take much water so go slow.

Then just put some on your sponge and start scrubbing! After you scrub the tub rinse the residue off and admire your thriftiness!

This has a great smell and makes your hands soft!

Friday, June 17, 2011

My Blooming Garden


All of these plants are blooming in my garden! For those of you who took a guess at the plants, here are the answers!
Tomato

Cucumber

Bell Pepper

Potato

Thursday, June 16, 2011

Picking and Cleaning Mulberries

Our mulberry picking is almost over! We have spent the better part of two weeks picking and cleaning berries. When we first started this process I looked for the best way to clean the berries but did not come up with much. My hubby and I have come up with a method that works for us so I am going to share it with you!

First lay all of your old sheets out under the tree. If you do not have old sheets go get some at Goodwill or buy very very cheap ones on clearance somewhere. Next year I think we are going to use a parachute but I will talk about that another time. 
We tried to cover all of the big spots. It is sad to see the berries hit the ground.

Then talk someone into climbing the tree... in this case my husband was volunteered volunteered to climb up!
Yay for helpful husbands!
Then shake the tree and watch the berries fall! We choose to shake the tree instead of picking off each one because it is much faster and, more importantly, when you try and pick the berries off the tree they tend to just fall apart and mush all over your hands. We waste a lot less this way.

After you shake the tree pick each sheet up by the four corners and guide all of the berries together. Then take a few minutes to pick out all of the big sticks and leaves. I will warn you that when shaking the tree you also shake out a lot of bugs. Don't be worried, you will wash them all away in the following steps.


Then put all of the mulberries in a big container, we use a large storage tub.

Then fill that tub up with water. The tub will be very hard to move when filled so do it someplace convenient. We did this part on the front porch. After the tub is full let everything sit for a half hour or so to let as much of the bugs and gunk float to the top as possible.

After you let everything sit skim off all of the big stuff on top and put that into a different bucket. You will skim off allot of berries with the gunk. We used these for juicing because you do not need to clean them as much. I will talk about juicing later on in the week.

Then take a fine mesh strainer and get off as much of the little floating stuff as you can. We use a splatter screen that you would use for frying.


Ok, now all of the big stuff is gone. We started doing all of these steps outside on the porch. It was easier to bring smaller batches in to clean rather than try to do the whole bucket all at once.

Now we go to the four bucket rinse method. I know it sounds like a lot but by doing it this way we are able to work together and you do not waste as much water.


The big pot holds the berries right out of the tub then as they go down the line we let the berries float in each tub of water to get the gunk off. As you will see in the next set of pictures each bowl has cleaner and cleaner water. That means the berries are getting clean as they move down the line.

Big bucket gets the really dirty ones then we take a handful and drop them into the next pan


Then they get taken out of the second pan and put into the bowl

Then from the bowl into the colander in a sink full of water. I use the colander to separate the good berries from the little bits of gunk still left, that way I can change the water less often.  Then into the final measuring cup.

This might seem like allot of steps but it is allot easier then picking bugs and leaves off of each one and if you run water over a handful at a time you will waste a TON of water and be cleaning forever.


After the berries are clean I put them in zip lock bags. The pies each get four cups and I also set enough aside for jam.
This is just from one night
Some other tips:
  1. Little red bugs like to live on the berries. If you are cleaning in your house, put a towel under the pots and spray some soap all over it to stop the bugs if they try and get out. They are very very small and you might miss them crawling on the counter if you are not careful. 
  2. Leave your shoes outside or you will track purple though the house.
  3. Do not stand under the tree when it is being shaken.  It sounds obvious but.... well, I forgot once. 
  4. As the season goes on, the berries will get bigger and they are easier to clean. By that time you should have shaken a lot of the dead stuff off the tree.
  5. You do not need to try and take off the stems. There is really no way to do it and the stems break down and disappear in the pies and jams. I promise you will not even know they are there.
  6. Remember that you are doing something good for your family and most good things take time and effort!

Thursday, June 9, 2011

No Spend June: The First Week


Well, our no spend June is going very well in some ways and more difficult than expected in others. We are doing great in the food department. I have cooked every night and we are going though all of the foods that I have been moving around the pantry and freezer for months. This is doing a few things:
  1. Teaching me what foods I buy but we really don't want to eat.  For example, I have four boxes of Hamburger Helper staring at me. I don't really ever want to make them but I think "they are only a dollar and I might want a quick meal some day." I just need to realize that I am no longer interested in much pre-made boxed stuff and just need to walk by the sale. The little Polish girl inside of me is screaming, "buy the cheap stuff!"
  2. If I do not have the option to eat out, then I cook more easily. I have found that taking restaurants out of the option list means that I figure out what to make more easily and I cook it with less grumbling.
  3. I am getting very creative with left overs. I am becoming much better at using left overs for lunch the next day and making them into something new and tasty. 
We have had to spend money in three areas:
  1. We had a pipe break in our wall, and my hubby and father in law had to rip out part of the wall to fix it. That meant we have to buy parts. Now the good news is I have men in my life who can fix just about anything so the repair was $60 instead of a few hundred dollars for a plumber's bill. 
  2. Gas. We had to buy gas to drive to and from a party over the weekend. I need to try and do better in this area and condense my running around town.
  3. Canning. This was an unexpected expense. As I'm sure you have seen, our Mulberry tree was ready to harvest this week and I was missing a few things I had to have to preserve the berries. The good news is I have a wonderful mother and mother in law that gave me a lot of cans and stuff so I only had to buy a few small things like lids and pectin. 
Overall the first week went well but I hope to do better this week! Lets all just pray no more pipes break please and thank you! 

Tuesday, June 7, 2011

Mel's Mix Dirt for the Square Foot Garden

Dirt! Yes, today's post is all about dirt.... The dirt I use in my square foot bed is very specific. In the book “All New Square Foot Gardening” by Mel Bartholomew, they call it Mel's Mix and it is:
  • 1/3 vermiculite
  • 1/3 peat moss
  • 1/3 compost (Mel recommends five different manufactures)
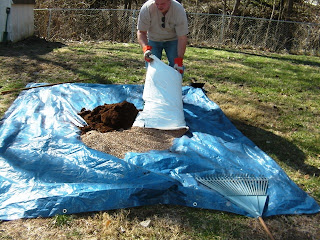
This is done by volume. My three small garden beds were each 4′x4′ and needed 6″ of mix to fill them. 4x4x.5=8 cubic feet of Mel’s mix. So I needed 24 cubic feet of mix, 8 cubic feet of each item. I ended up mixing one bag of vermiculite (3.5 cu ft), one bag of peat moss (3cu ft ) and one bag of each types of compost (so five bags 1 cu ft each) and that seemed to be about all the tarp (and our arms) could handle at a time. That mix filled just over one bed. 

The Benefits

Why not just use dirt? You can, but there are some great benefits to Mel’s mix:
  • Planting and germination–Mel’s mix is much lighter than dirt, and it doesn’t get compacted down because you never walk on it. This allows seeds to push through much easier, so you don’t have to be so particular about what depth you plant the seeds.
  • Root systems–It’s really easy for roots to grow and spread in Mel’s mix.
  • Weeds–by this I mean, WHAT WEEDS! As long as you are careful with what compost you get, there are no weed seeds in your mix (unlike dirt). If a seed blows in, the mix is so loose it’s easy to tug them right out. One of my compost bags was mushroom based so I did have to pull out some shrooms...
  • Drainage–with Mel’s mix, you cannot over water it drains right out! 
When you use Mel’s mix, you don’t have to worry about what kind of soil you have, or amending the soil. Every time you plant a square, you add a trowel of compost. You don’t have to rotate where crops are planted, or do anything special, unless you want to.

Cost break down
  • large bag (3.5 cu ft) vermiculite, $23.00 each
  • large bale (3.8 cu ft compressed, expands to be more) peat moss, $5.00
  • bags (1 cu ft) compost, $2.00 each (average price)

Pour compost on a large tarp. If you used several types, mix it following the instructions below before adding other materials.
  • Add vermiculite.
  • Add peat moss.
  • If it’s really dry and dusty, mist it down but do not get it wet (makes it heavier).
  • Mix by taking two corners of the tarp and pulling them over the tarp (like making a burrito) until all the material is close to one edge, lay the tarp flat. Then take the opposite two corners and pull the other direction, lay the tarp flat. Switch back to the other side and pull until all material is running down the middle of the tarp.
  • Now shift 90 degrees (so you are looking down the column of material) and repeat. Basically, pull north, then south, then north until it’s in the middle. Then pull east, then west, then east until it’s in the middle again. Repeat until it is uniformly mixed.
These are some of the bags that we used.
Laying everything out to see what we have
My hubby dumping out vermiculite
Our filled boxes!

We got the peat moss at Home Depot, the vermiculite at a local green house, and then the five types of compost were a challenge. We got two types at Home Depot, then three types at a different local landscaping and green house. We had to go to a few places to find enough different types of compost. Filling the boxes did take longer then we thought it would but now that I'm growing in the dirt the time was well worth it. 

Here are some other tips to help you. 
  • Buy some extra bags of the cheapest compost to fill in if you need more stuff to fill up the beds. 
  • A bigger tarp is better. A big tarp is easier to mix on and you can store your extra dirt in it. 
  • Buy the bigger bags - you can get it cheaper that way
  • If you can not find vermiculite you can use perlite.
  • If you can only find three or four kinds of compost, go with it, I wont judge you and we just wont tell Mel...


Sunday, June 5, 2011

Garden Update

Hello! I hope that everyone is having a fabulous weekend! I thought today I would post some updated pictures of my garden. Everything is doing well, I have had a bunny munching on my brussels sprout plants so I am going to have to cover them again and probably find some organic spray to put on them. 


My cabbage and peas


Cabbage head starting to form


Baby pea

Tomatoes and peppers


First baby tomatoes!


Onions, brussels sprouts, and carrots
Beans, cucumbers and more peppers


Designed by Simply Fabulous Blogger Templates